Table of Contents
Panel Recruitment
 Updated
by Billy Dowell
Updated
by Billy Dowell
Using Research Panel Recruitment
We originally created Great Question to simplify managing your customer research panel.
It's what you could call our bread and butter.
Access Your Default Panel
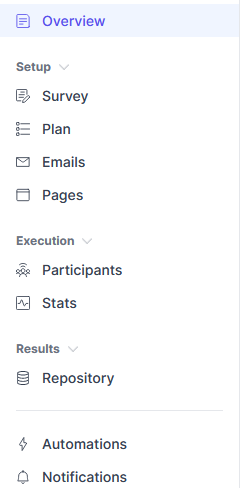
Sections below are in the order of the menu options within the study and image below.
Panel studies are used to pull in your candidates from the Candidates page, get their consent to be contacted for future Great Question studies, and to gather any details that you are looking for via the signup form.
- Click on Studies in the left-side menu to reveal a list of studies and your panel.
- You will notice that there is a My studies view, and an All studies view. My studies will include only studies that you are the owner of.
- Click on your panel to view and edit the details of the panel.
Customize your screener
If you need to review or edit your screener, you can make any changes in the Screener tab.
- If you decide to add a screener later, toggle on the screener option in the Plan tab.
Customize your signup form
The Signup Form is where you can create questions to help you find the best candidates for your panel.
- Click Survey on the left-side menu.
- Create the questions, or make changes to any questions, as needed.
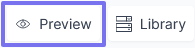
- Optional: Preview your study by clicking on Preview, in the top right corner, next to Library.
Customize your plan
Your panel plan determines how many participants you want to join your panel. If you are editing your default panel, you may not want to set a limit, but if you are editing a new panel, you can change the number of people allowed to join.
- Optional: Add a description for the Research goal.
- Set your Participant limit (how many total people you want to talk to).
- Leave the Screener toggle off if no screener is necessary. If you do want a screener, flip the toggle on.
- Toggling the Screener on and off does add or remove a tab called Screener. More on screeners here.
- Select your preferred Consent form option.
- Optional: Click on Show additional setup to see more settings, such as:
- Custom study attributes: More on study attributes here.
- Participant experience language to change the preferred language.
Customize your emails
There are three emails that you can edit for your panel: Participation Invites, Invite reminder, and Welcome. All can be edited using the steps below.
Updates to the study email templates do not change the templates that are saved in the Email templates page.
- Click Emails on the left-side menu.
- Select Preview to see what the email will look like for your participants. You can send yourself a test email, or just preview it in your browser.
- Click on Edit to make any changes that you would like, such as; default sender, choosing an email template, email subject, email body, or even the CTA button.
- Each email has the option to be changed from Branded HTML Layout to Rich Text Format (RTF) via the Email Design dropdown.
- At this time, this must be done for each email type, per study. There is no bulk option for all emails on a study, and no bulk option to apply across all studies for the account.
- The Email Design can also be changed per email as you are getting ready to send, vs changing the study's default.
- Each email has the option to be changed from Branded HTML Layout to Rich Text Format (RTF) via the Email Design dropdown.
- Click Save in the upper right-hand corner.
- Once your changes are done, you can preview it again to see if your changes match what you want the page to look like.
Customize your landing page
The landing page is where the process begins. Where your candidates will first be brought to join your panel.
- Click Pages on the left-side menu.
- Select Preview to see what the page will look like for your participants.
- Click on Edit to make any changes that you would like:
- Such as adding a headline, description, button text, personal note, title, subtitle, items, and custom URL.
- Click Done in the upper right-hand corner of the edit view.
- Once your changes are done, you can preview it again to see if your changes match what you want the page to look like.
Repository
This is the study level repository. Review your study's insights and signup form responses that are specific to the study you are viewing.
- Each can be viewed by their respective subtab.
- Use the Search, Filter, and View options to narrow down your results, and change how they are displayed and sorted.
- Click on New to create a new insight.
- All of this data can also be found in the full Repository.
- Click Repository on the left-side menu.
- Be default, you'll see Insights. Use this page to create and view any insights for this study.
- Click on Summary responses to see a summary of participant responses to the signup form.
- Click on Individual responses to see each participant's responses.
Use the Export to CSV button, shown on the two responses pages, to export your participants' survey response data into a CSV file.
Automations
- Select Automations to change the option to resend invites and send reminders for the participants to complete the task.
- Toggle the options you want on or off. Changes are automatically saved and confirmed with an updated successfully message.
Notifications
- Select Notifications to change when you receive an email about participants joining a panel and if you, or your teammates, send new invites.
- Toggle the options you want on or off. Changes are automatically saved and confirmed with an updated successfully message.
- If using the Slack integration, toggle the option on or off to receive those notifications as well.
Study Creation

While you’ll have a default panel study as soon as you make an account, you can create additional panel studies.
You can use these additional panel studies to recruit different types of personas (since you can tailor the sign-up screener survey), use different languages (if you’re on an Enterprise plan), or A/B test different landing page copy.
- Click on New Study + on the top left, or New Study in the top right, while in the Studies page.
- Select Panel recruitment.
- Name your panel.
- By default, you will see the name as "Untitled study type (current date)"
- Optional: Change the study owner if you are creating this study on behalf of another team member by clicking on the Add Collaborator icon to the right of the study title.
- Follow the steps for customizing your plan and customizing your signup form.
- Review the details of your study. You should see all green checkmarks.
- If a step does not have a green checkmark, click on the edit icon to go back to that step's page and make the required updates.
- Once everything is all green, click Create.
- Done! Study Published! 🙌
Now that your panel is set up and ready to go, it is time to add some candidates!
Have Questions?
Please reach out to us in the chat or at [email protected]!